You've found droppings under the sink, heard scratching behind the kitchen wall, or checked a trap that's still empty even though something ate the bait. Now you're looking at shelves of snap traps, electronic traps, glue boards, and black bait boxes, trying to work out what belongs in your home.
Good rodent control equipment has to do more than catch or kill an animal. You need to place it safely, reach it for inspection, handle the animal humanely, and verify that the entry problem is fixed. In a Miami home, rental, or condo building, the right choice starts with those practical questions, not the strongest claim on the package.
Table of Contents
- Rodent Control Equipment Types at a Glance
- Bait Station Tiers and Where Each One Can Go
- Exclusion Work and Florida Legal Limits
- How to Set Snap Traps for Mice and Rats
- Measuring Whether Your Equipment Is Working
- When to Hire a Licensed Pro and What to Ask
Rodent Control Equipment Types at a Glance
Most Miami homes need three things: a capture or bait device, a way to block entry, and a way to confirm the rodents are gone. Buying only the first leaves the job unfinished.
Use this comparison as a selection guide, not permission to put every device anywhere. Product instructions, access for servicing, and the people and animals using the room all matter.
| Equipment | Best for | Where it works | Child and pet risk | Main limit |
|---|---|---|---|---|
| Snap traps | Mice and rats indoors | Confirmed wall runways, out of reach | Lower when secured inside a protective enclosure; exposed traps can injure | Daily checks and carcass removal |
| Multi-catch live traps | Mouse capture where lawful disposition is arranged | Accessible indoor locations and sheds | Keep occupants away from captured animals | Requires prompt, humane handling and a lawful disposition plan |
| Electronic traps | Target rodents specified by the device | Accessible, protected indoor locations | Keep inaccessible; follow device instructions | Requires power upkeep and access to retrieve catches |
| Glue boards | Limited mouse applications | Protected, low-traffic locations | Exposed adhesive can catch pets and non-target animals | Live-animal welfare and handling problems |
| Tamper-resistant bait stations | Rats or mice when labeled bait use is appropriate | Indoors or outdoors according to tier and label | Depends on station classification and placement | Pesticide exposure, servicing, and label restrictions |
| Hardware cloth and sealants | Blocking entry | Vents, gaps, and pipe penetrations | No toxic bait, but installation needs care | Doesn't remove animals already inside |
| Tracking tunnels and tracking products | Checking activity | Protected runways and monitoring points | Product-dependent; don't assume powders are harmless | Detects activity rather than removing rodents |
| Cameras and motion sensors | Watching movement over time | Accessible attics, garages, and device areas | No capture mechanism or bait exposure | Power, viewing angle, and interpretation |
Separate the device from the pesticide
EPA's 2008 decision covering 10 rodenticides required ordinary homeowner bait products to use bait stations instead of loose pellets or meal, limited packages to 1 pound or less, and excluded second-generation anticoagulants from those consumer products. An empty station is generally application equipment, while a station sold with rodenticide falls under pesticide-label requirements, as explained in the EPA rodenticide safety review.
That distinction matters at the store. A durable-looking empty box doesn't make every bait suitable for residential use, and a locking lid doesn't cancel the label.
For routine indoor work, public-health guidance generally favors snap traps as effective, inexpensive alternatives to rodenticides around homes. Their practical advantage is that an accessible catch can be retrieved and recorded.
Selection rule: Choose equipment for the rodent, the room, and the people living there, not the device with the highest kill claim.
A live trap you can't check, an electronic trap buried behind cabinetry, or a bait station nobody services is a poor choice regardless of its advertised performance.
Bait Station Tiers and Where Each One Can Go
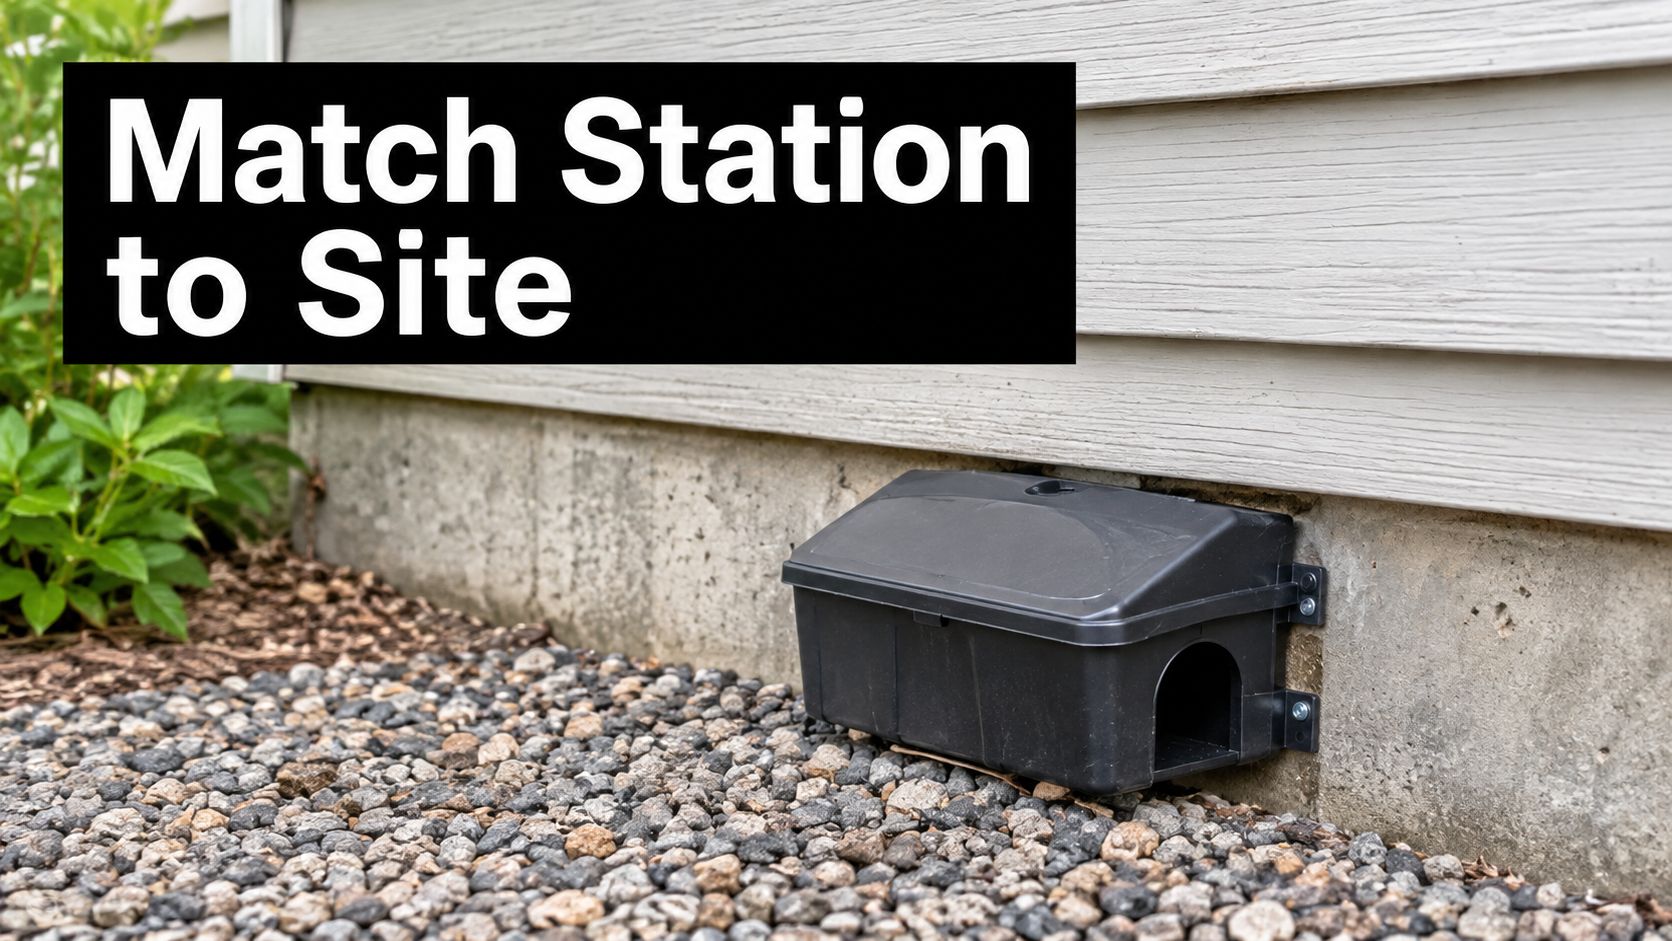
EPA classifies household bait stations by tamper resistance and weather resistance. These aren't interchangeable features: a station that resists a child indoors may still be unsuitable for a wet backyard.
The following classifications and placement limits come from EPA's household bait-station guidance, which also identifies more than a dozen registered ready-to-use house-mouse products, with some also registered for rats.
| Tier | Tamper resistance | Weather resistance | Permitted placement |
|---|---|---|---|
| Tier 1 | Resists young children and dogs | Yes | Indoors and outdoors within 50 feet of buildings |
| Tier 2 | Resists children and dogs | No | Indoors only |
| Tier 3 | Resists young children | Not qualified for outdoor placement | Indoors only where pets cannot access it |
| Tier 4 | Not demonstrated | No | Indoors where neither young children nor pets can reach |
Outdoor placement needs a station classified for the environment, not merely a box that looks sturdy.
Choose the location before choosing the station
Start with the proposed placement. Is it indoors or outdoors? Is the location permitted by the product label? Can the station be inspected without moving stored furniture or entering an unsafe space?
Then consider access by children, dogs, and other animals. Select a station whose demonstrated protection covers the setting, rather than assuming a less protective station becomes suitable because it's behind a planter.
Consider a hypothetical Coconut Grove duplex with a backyard shed and a dog. An outdoor bait installation would require the outdoor-qualified classification and label-compliant placement. A station intended only for protected indoor use wouldn't become suitable just because the shed roof provides some shelter.
The kitchen needs its own assessment. Nothing about an outdoor station justifies loose bait under the sink, and a mouse-labeled product shouldn't be assumed suitable for rats.
Make servicing part of placement
Before installing a station, decide who will open it, inspect it, record consumption, and maintain it. If access depends on a tenant being home or a locked service gate being opened, arrange that access before treatment begins.
- Match the species: Check whether the label covers mice, rats, or both.
- Protect the location: Account for weather and foreseeable animal access.
- Keep it serviceable: Don't hide the station somewhere the technician can't reliably inspect.
- Plan beyond bait: Removal and entry prevention remain separate tasks.
The Rodent Control service description captures that combined objective: remove the rodents and seal the way back in.
Open trays and loose pellets aren't an extra household station tier. The indoor-only classifications remain indoor-only, even when a convenient outdoor hiding place is available.
Exclusion Work and Florida Legal Limits
Florida distinguishes commercial nonchemical rodent control from ordinary work on your own home. Owning a trap doesn't establish that someone is qualified to deploy it commercially in a rental building or sell an exclusion service.
A limited wildlife-management certificate can authorize specified commercial trapping, mechanical or electronic devices, and exclusion work. Nuisance-wildlife traps generally require inspection at least every 24 hours; confirm the applicable credential and scope through the FDACS pest-control FAQ.
| Task | What a homeowner or manager should establish |
|---|---|
| DIY trapping at home | Safe placement, lawful use, and ability to inspect |
| Paid nonchemical control | Appropriate Florida credential for the work |
| Rodenticide treatment | Qualification for pesticide work and label compliance |
| Crawlspace exclusion | Animal-removal plan before permanent closure |
| Shared-building repairs | Access permission and responsibility for adjoining spaces |
Remove animals before permanent closure
Don't seal an occupied space and hope the animals find another way out. That can leave an animal trapped where nobody can retrieve it, creating welfare, odor, and sanitation problems.
Miami Beach's crawlspace requirements address humane removal before permanent closure and provide for one-way escape doors during exclusion. For an actual job, confirm the current municipal requirements rather than treating a general equipment list as legal clearance.
A workable sequence is:
- Inspect the occupied space. Identify current activity and likely access routes. Distinguish an old opening from an actively used route before making permanent changes.
- Arrange humane removal or an appropriate one-way exit method. A professional should determine whether the method suits the animals, building, and applicable rules.
- Verify clearance, then complete permanent repairs. Use suitable metal screening, properly secured patches, compatible sealants, and door protection where needed. Don't treat a cosmetic smear over a damaged opening as a durable repair.
- Continue monitoring the repaired areas. If fresh activity appears, investigate the route rather than adding more devices.
The installation details matter as much as the material name. Screening needs secure edges, pipe penetrations need a repair suited to the surrounding surface, and doors need to close against their protective components. Compare those choices using the guide to rodent exclusion materials.
Check what the repair affects
Inspect trash lids, pet-food storage, and dryer-vent conditions alongside the building openings. Don't obstruct necessary ventilation or equipment operation while trying to exclude rodents.
A more lethal device isn't a better device if nobody can reach the animal afterward.
For condo boards and landlords, put access arrangements in writing. Confirm who checks equipment, who authorizes work in shared spaces, and who handles inaccessible catches. Check current requirements with FDACS, the municipality, and the association before work starts.
How to Set Snap Traps for Mice and Rats
An empty snap trap beside a stove does not prove the mice are gone. It may only show that they travel along a tighter route behind the appliance. Each placement is a service and welfare decision: the trap has to intercept activity, stay away from children and pets, and be checked promptly.
Inspect first, then set. A device chosen for quick action still fails when it sits outside a runway, blocks a walkway, or cannot be serviced safely.
Set traps where the evidence leads
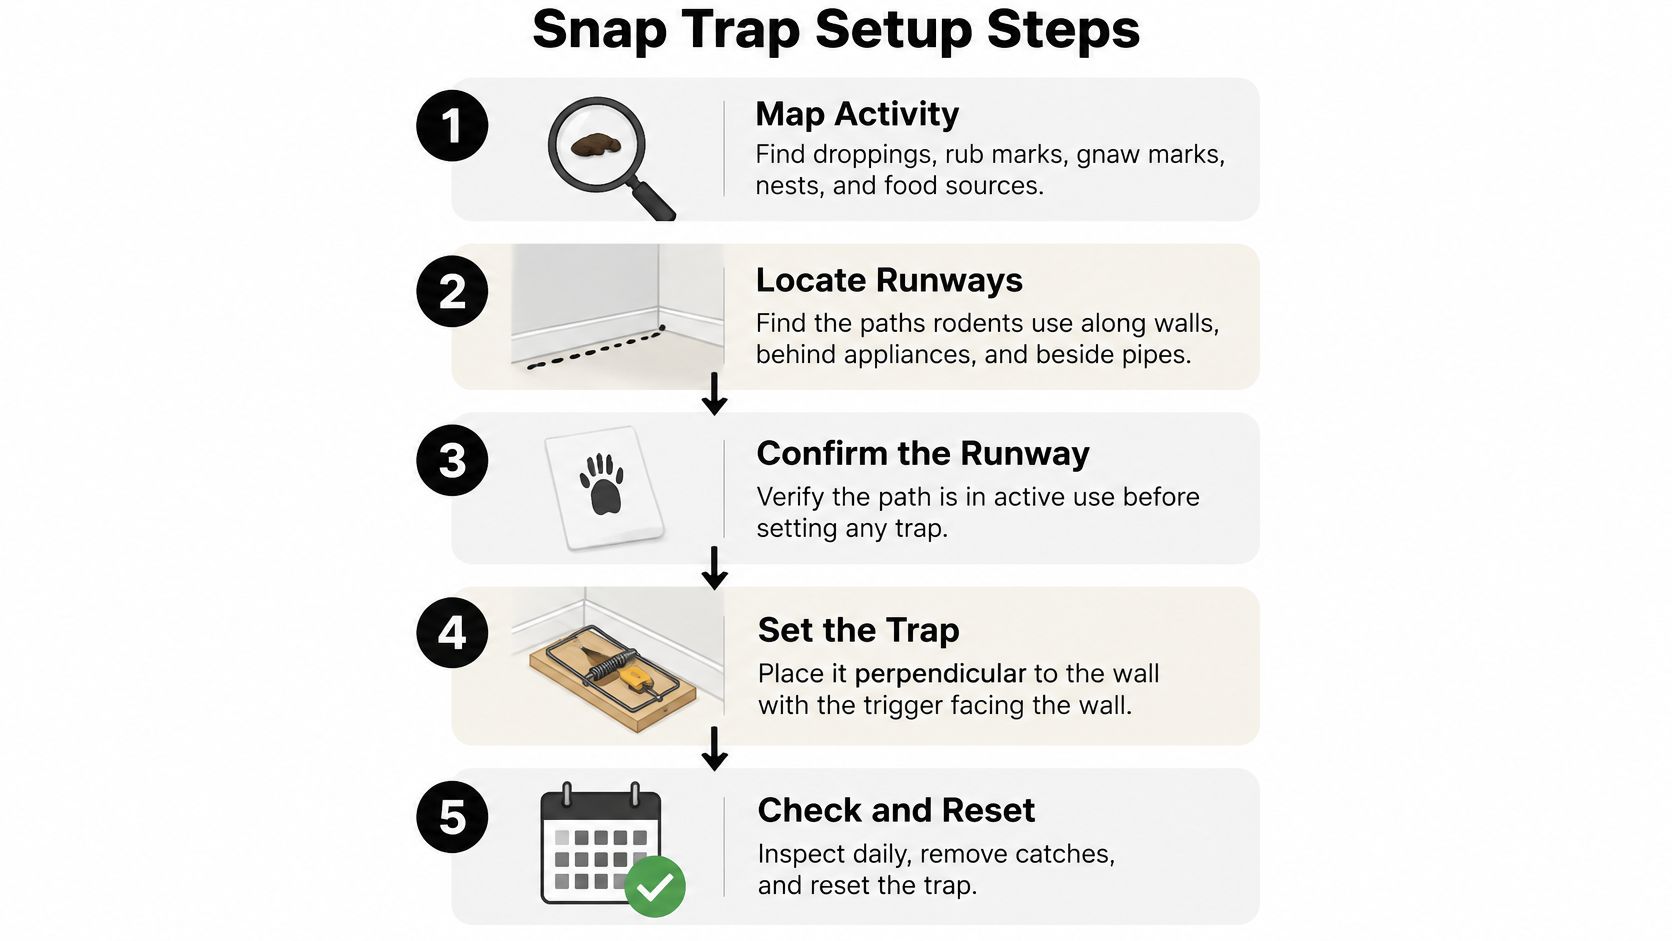
- Map active signs. Plot droppings, rub marks, gnawing, nesting material, and food access on a simple floor plan. Record the exact location rather than only the room name.
- Trace the route. Check wall lines, appliance gaps, pipe chases, under-sink areas, and garages. Confirm signs before assigning equipment to a location.
- Set perpendicular to the wall. Place the trap across the runway with the baited trigger end nearly touching the wall. The rodent should encounter the trigger while traveling, not after passing the device.
- Keep bait small. Use a very small amount of peanut butter, nuts, or dried meat. Excess bait can let an animal feed without properly engaging the trigger.
- Match the animal's behavior. Cautious rats may need baited traps left unset until they accept the bait. Mice often investigate sooner, but confirmed routes still need enough traps to provide coverage.
- Use pairs where activity is concentrated. If bait disappears without a capture, inspect bait quantity, trigger operation, orientation, and whether the trap shifted.
- Protect non-targets. Keep traps inaccessible or inside secured protective stations. A location with good rodent traffic still has to be safe for the household.
- Check and record every day. Retrieve catches hygienically, reset or reposition the trap, and note the result before changing the layout. A sprung or blocked trap was not providing normal coverage.
For an older or heavier mouse infestation, the National Park Service snap-trap placement guidance uses about 10 traps per 12-by-12-foot area as a starting benchmark. Confirmed runways determine where those traps go.
Correct placement before buying another trap
When catches are low, diagnose the setup before changing equipment. These checks separate a placement problem from a device problem.
| Field finding | Placement response | Reason |
|---|---|---|
| Droppings along a wall | Set traps perpendicular, with triggers near the wall | Intercepts the natural route |
| Signs concentrated in one route | Use paired traps | Covers the active approach |
| Bait taken without a capture | Reduce bait and test trigger movement | Identifies a feeding or mechanism problem |
| Fresh signs in another area | Move equipment toward that evidence | Avoids servicing an inactive location |
| Trap cannot be reached | Change the placement or method | Allows prompt checking and removal |
Enlarged plastic trigger plates can offer more actuation surface than narrow triggers, but hardware will not compensate for a trap set away from activity. If bait keeps disappearing, check whether the animal can remove it without putting enough pressure on the trigger.
If fresh signs continue elsewhere, adjust the layout to those signs. Do not keep servicing a convenient location while ignoring the active route behind an appliance.
Do not abandon snap traps in wall voids, locked utility areas, or other places where a caught animal cannot be removed. A trap that cannot be checked promptly creates a welfare and odor problem.
Cleanup is part of the job. Wear gloves, wet contaminated material with an appropriate disinfectant, follow the label's contact-time instructions, and collect waste without raising dust. Do not sweep or vacuum dry droppings. Get professional help when contamination or access makes safe cleanup difficult.
Measuring Whether Your Equipment Is Working
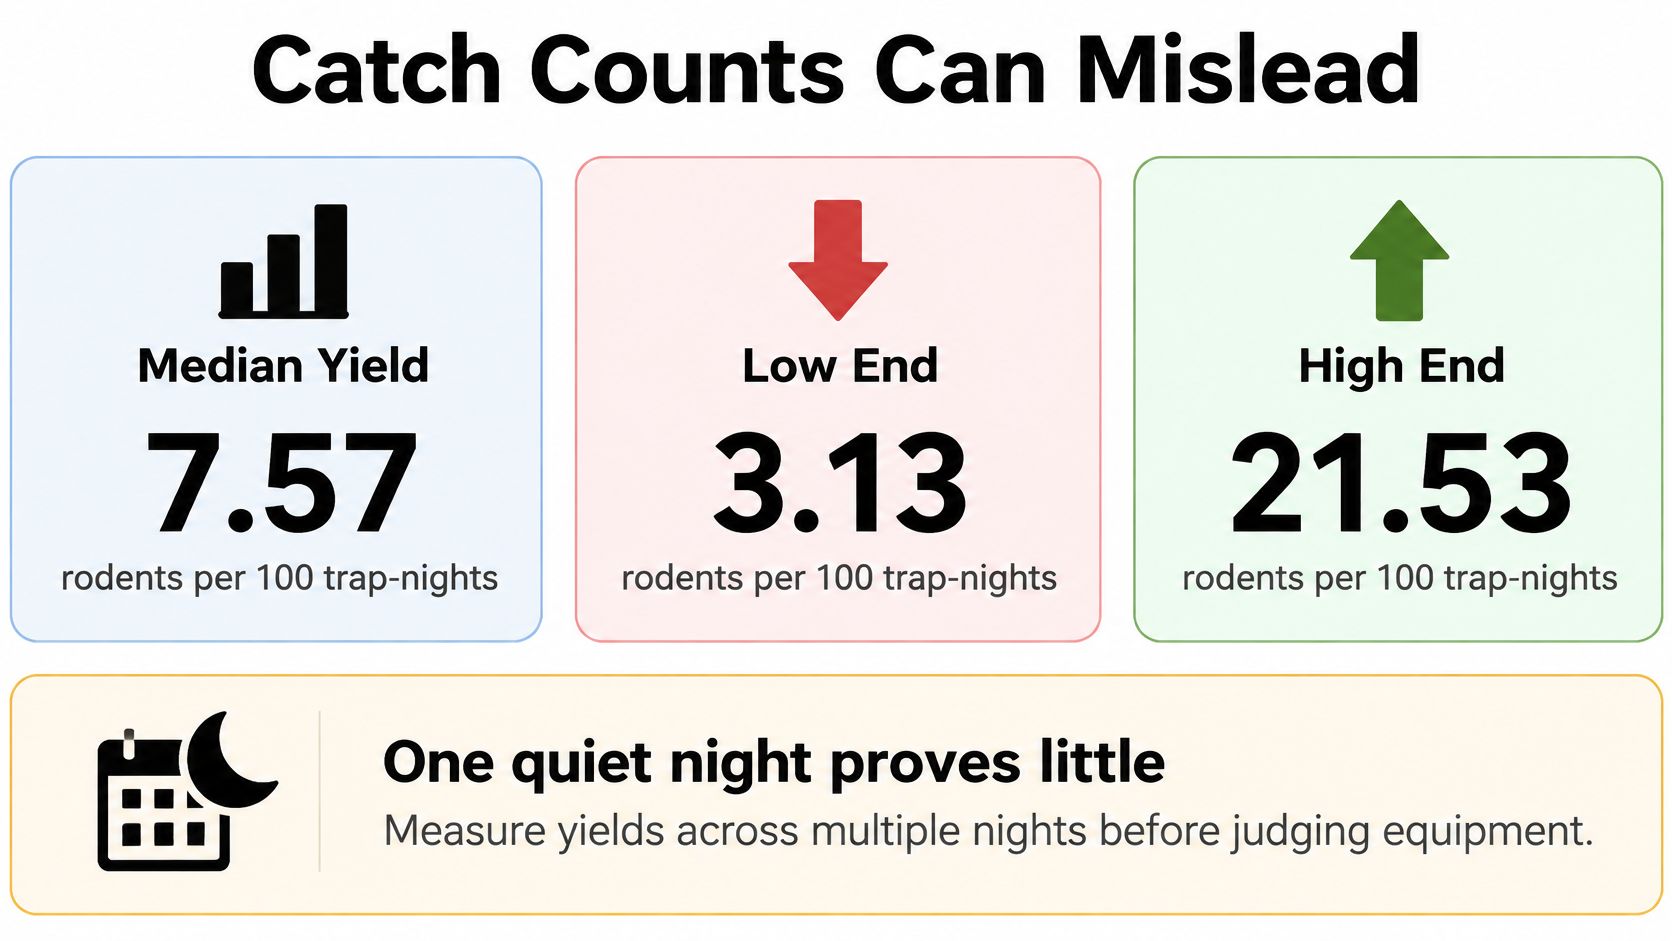
Three nights of empty traps tells you the traps were empty. It might mean the rodents are gone. It might also mean the bait dried out, the trigger never fired, or the devices sat where nothing was traveling. The research gives you reason to stay skeptical: controlled trials summarized in Washington State's rodent-control guidance reported 40–69% control by feeding-census measures, median removal yields of 7.57 rodents per 100 trap-nights (ranging from 3.13 to 21.53), and one field study where 74–92% population reductions were followed by a return to pre-treatment levels within six months because access and food conditions remained.
A quiet check is only one piece of evidence.
Record effort as well as catches
A trap-night records a trap operating overnight. Logging effort lets you separate a real drop in activity from a drop in how much equipment was running.
A sprung, unavailable, or disabled trap gave you no coverage. Record it as lost effort, note the cause, and correct it.
| Metric | How to record it | Reading that signals progress |
|---|---|---|
| Captures relative to trap-nights | Record catches and functioning trap-nights at every check | Declining catches alongside declining independent signs |
| Fresh droppings | Mark inspected areas and record new material after safe cleanup | No fresh droppings during the verification period |
| Tracking activity | Check suitable ink cards or tracking pads consistently | No new tracks during verification |
| Bait uptake | Record bait condition and consumption using a consistent method | Reduced uptake supported by other evidence |
| Entry-point repairs | Photograph each repair and record its location | Identified routes repaired and checked |
Untouched bait still needs a second look. If cameras show rodents walking past the station, investigate bait acceptance or placement instead of writing it up as success.
A camera aimed at the wrong run produces an empty recording in an active building. Log where the camera points, whether it recorded, and what area it covered.
Combine independent signs
Tracking cards can confirm movement through a protected route. Cameras or motion sensors can investigate activity in accessible attics and garages where you cannot rely on visible droppings alone.
Pick monitoring equipment that answers a specific question. Is the repaired pipe penetration still being used? Are rodents approaching the station? Is movement continuing behind the stored boxes?
Keep that evidence in an integrated pest-management plan so each service visit builds on the last instead of standing alone.
Pair the following video with a written inspection and monitoring record.
- Log each check: Include device condition and anything that prevented inspection.
- Photograph changes: Compare gnaw marks and repairs from consistent viewpoints.
- Investigate contradictions: Fresh tracks beside empty traps call for reassessment.
- Document closure: Keep repair evidence with the activity log.
Completion standard: Require a set verification period of consecutive checks with no captures and no fresh sign, together with documented entry repairs, before you call the job finished.
A documented clean stretch means more than a pile of discarded traps.
When to Hire a Licensed Pro and What to Ask
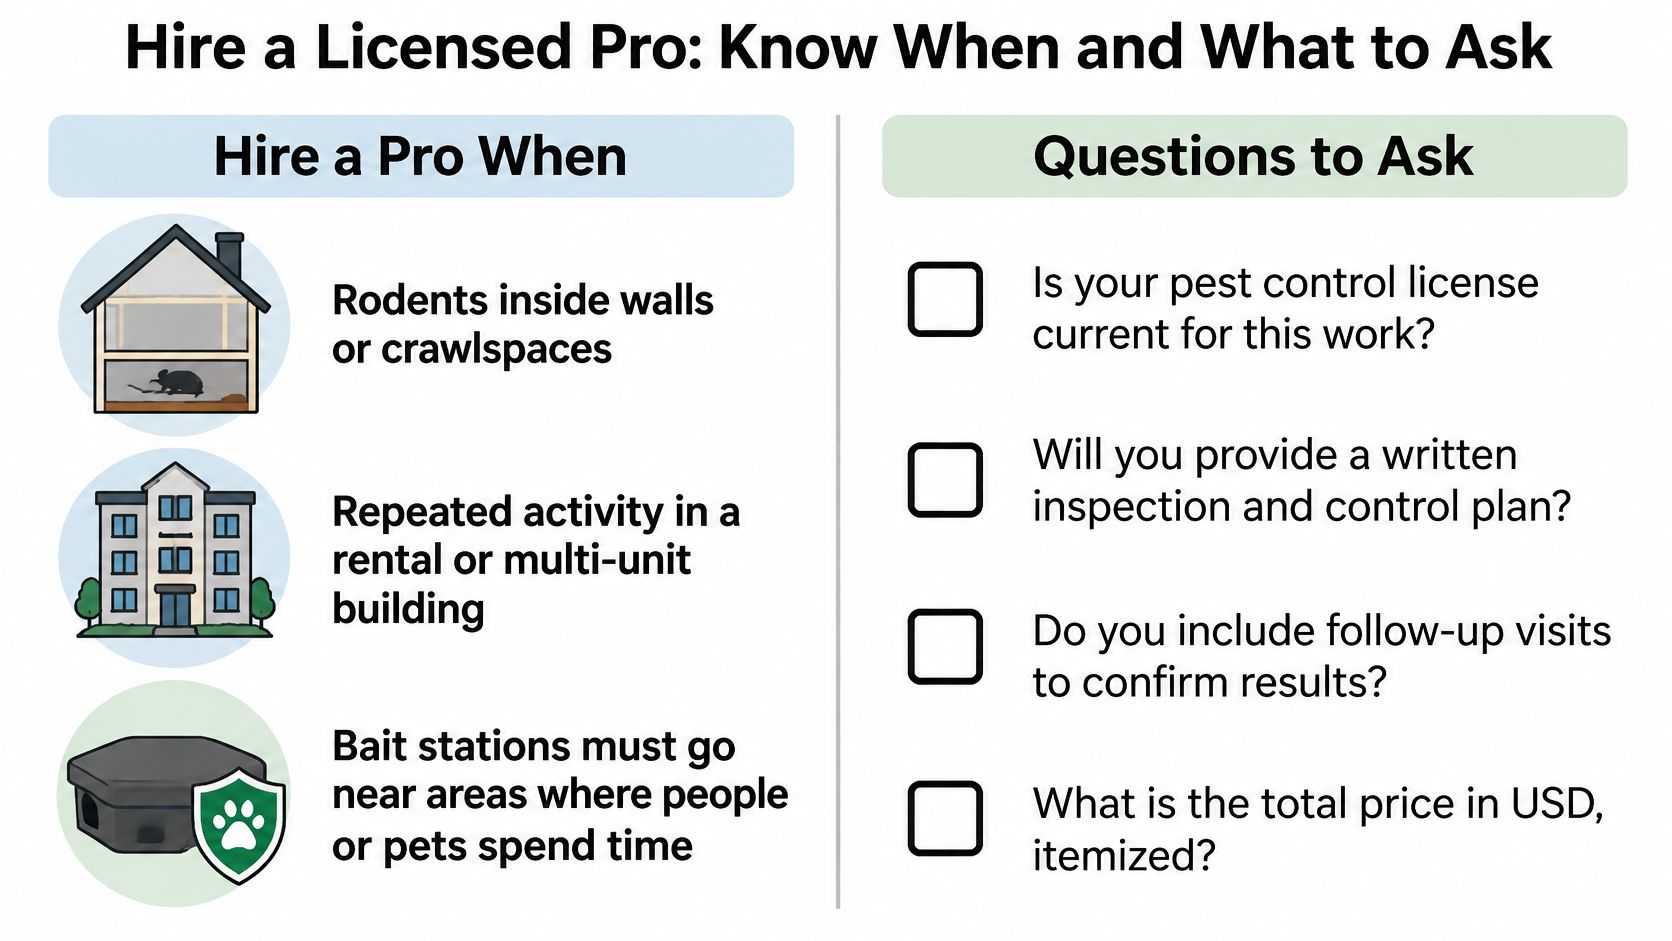
Hire a qualified professional when rodents are inside inaccessible walls or crawlspaces, activity keeps returning in a rental or multi-unit building, or safe equipment placement conflicts with children, dogs, or shared outdoor areas. Bring in help when correctly placed trapping and completed repairs still don't resolve activity, or when a property transaction needs a documented inspection.
A professional earns the fee through inspection, safe deployment, access planning, repairs, and verification. Expensive equipment alone doesn't establish any of those.
Use this checklist to compare the proposed work, not just the quoted total.
Ask for a plan you can inspect
- Appropriate Florida credentials and active insurance: Verify the credential covers the work being offered. Use the Florida pest-control license guide to prepare your checks.
- Written equipment layout: Ask for device types, station classifications, placement locations, inspection arrangements, and responsibility for retrieving catches.
- Location-specific exclusion work: The proposal should identify repairs, not merely promise to seal the property.
- Before-and-after evidence: Request trap logs, consumption records, photographs, and relevant monitoring observations.
- A defined clearance standard: Ask how the provider will demonstrate that activity has stopped using the verification approach above.
- Follow-up terms: Confirm what return visits include, what triggers extra charges, and who handles newly discovered access points.
Pay for evidence rather than novelty
A camera, sensor, or electronic trap can be useful when it resolves a clear inspection question. Ask the provider what decision the equipment will support and what they'll change if activity continues.
A sensible response might involve repositioning traps, correcting an overlooked entry route, or improving access for inspection. Automatically adding more bait without explaining continued activity isn't a complete diagnosis.
For an inaccessible cavity, ask how the provider will avoid leaving an unretrievable catch. For a shared building, ask how they'll coordinate neighboring units and common areas. Those answers often tell you more about the proposed service than a device's advertised features.
Compare scope before comparing price. A quote for setting equipment isn't equivalent to a proposal that includes exclusion, servicing, humane handling, and documented verification.
Pestless Inc. connects Miami-Dade homeowners with licensed, insured providers through free, no-obligation quotes and doesn't perform treatments itself. Visit Pestless Inc. to describe your rodent activity and request a local provider who can explain the equipment, entry repairs, and follow-up evidence your property needs.
Dealing with this pest right now?
Pestless connects you with a licensed, insured Miami pest control provider for a free, no-obligation quote.