Your car pulls in, the door comes down, the light clicks off, and ten minutes later you're back with a flashlight because something moved near the recycling bin. That's how a rat problem usually announces itself in a Miami home. Not in the kitchen, not in the attic, but in the garage, in the quiet hours after the door closes.
A garage is a room built for storage, and storage is exactly what rodents need. It holds cardboard, paper, old clothes, birdseed, a bag of dog food, and the one dark corner nobody has swept since you moved in. Treat it as the first place to look and the first place to fix. What follows covers the evidence rats leave behind, the gaps they use, the health and vehicle risks most guides skip, a cleanup sequence that keeps you safe, and the point where the job outgrows a homeowner's toolkit.
Table of Contents
- Signs That Rats Are Living in Your Garage
- What Draws Rats Into a Garage
- Where Rats Get In and How to Seal Them
- Health and Vehicle Risks You Should Not Ignore
- Safe Cleanup and Trap Steps to Follow
- Decide When to Call a Licensed Pro
Signs That Rats Are Living in Your Garage
You're standing in the garage with a flashlight, and the smell reaches you before anything else does, a stale, faintly ammonia note near the water heater. Then you see it: a cardboard box with a corner chewed into a ragged scallop, and a line of dark pellets along the base of the wall. Whether it's a mouse or a rat barely matters yet. Something with teeth is using the room, and the evidence is telling you where.
The U.S. Environmental Protection Agency frames rodent problems around three essentials: food, water, and shelter (EPA rodent prevention guidance). A garage supplies all three without trying, through stored pet food, uncovered trash, cardboard, paper, fabric, standing water, clutter, and gaps that connect the structure to crawl spaces or wall cavities. The EPA lists droppings, shredded nesting material, chewed food packaging, stale odors, and holes through walls or floors as the indicators worth acting on.
What makes the garage so useful as a diagnostic room is its position. It sits between the outside world and the inside of your home, so it's often the first detectable location before rodents move deeper. Read the evidence correctly here and you get a head start instead of a surprise in the pantry.
Many people can't read it. The National Pest Management Association reported in 2025 that 39% of U.S. adults could correctly identify signs of rodent activity, including droppings, gnawing damage, or grease marks (NPMA press release). Match what's in your garage against the table below.
| Sign | What It Looks Like | What It Tells You |
|---|---|---|
| Droppings | Dark, rice-shaped pellets along walls and under shelves | Rats are active and using the space regularly |
| Gnaw marks | Chewed cardboard, packaging, wood edges or wire insulation | Rodents are testing routes or feeding |
| Grease marks | Dark smudges along walls, beams and pipes | Rats are repeatedly travelling the same path |
| Nesting material | Shredded paper, fabric or insulation in corners | A nest is likely nearby |
| Odor | Musky, ammonia-like smell that grows over time | Activity or urine buildup is increasing |
Grease marks are the sign homeowners miss most often, because they look like dirt. A rat's coat picks up oil and grime as it squeezes through the same gap night after night, and it leaves a dark smear on the wood or pipe it brushes past. That smear is a route map. Follow it and you'll usually find the entry point at one end.
Practical rule: check at dusk and again first thing in the morning, when rats are most active, and photograph every sign before you touch it. A sharp photo of droppings beside a known object gives a professional the scale and location needed to confirm the species.
What Draws Rats Into a Garage
Think of your garage as a small hotel with three vacancies that are always advertised: a meal, a drink, and a quiet room. A rat doesn't need all three to move in, but it stays when it finds them together, and a garage usually hands over the full package in a single visit.
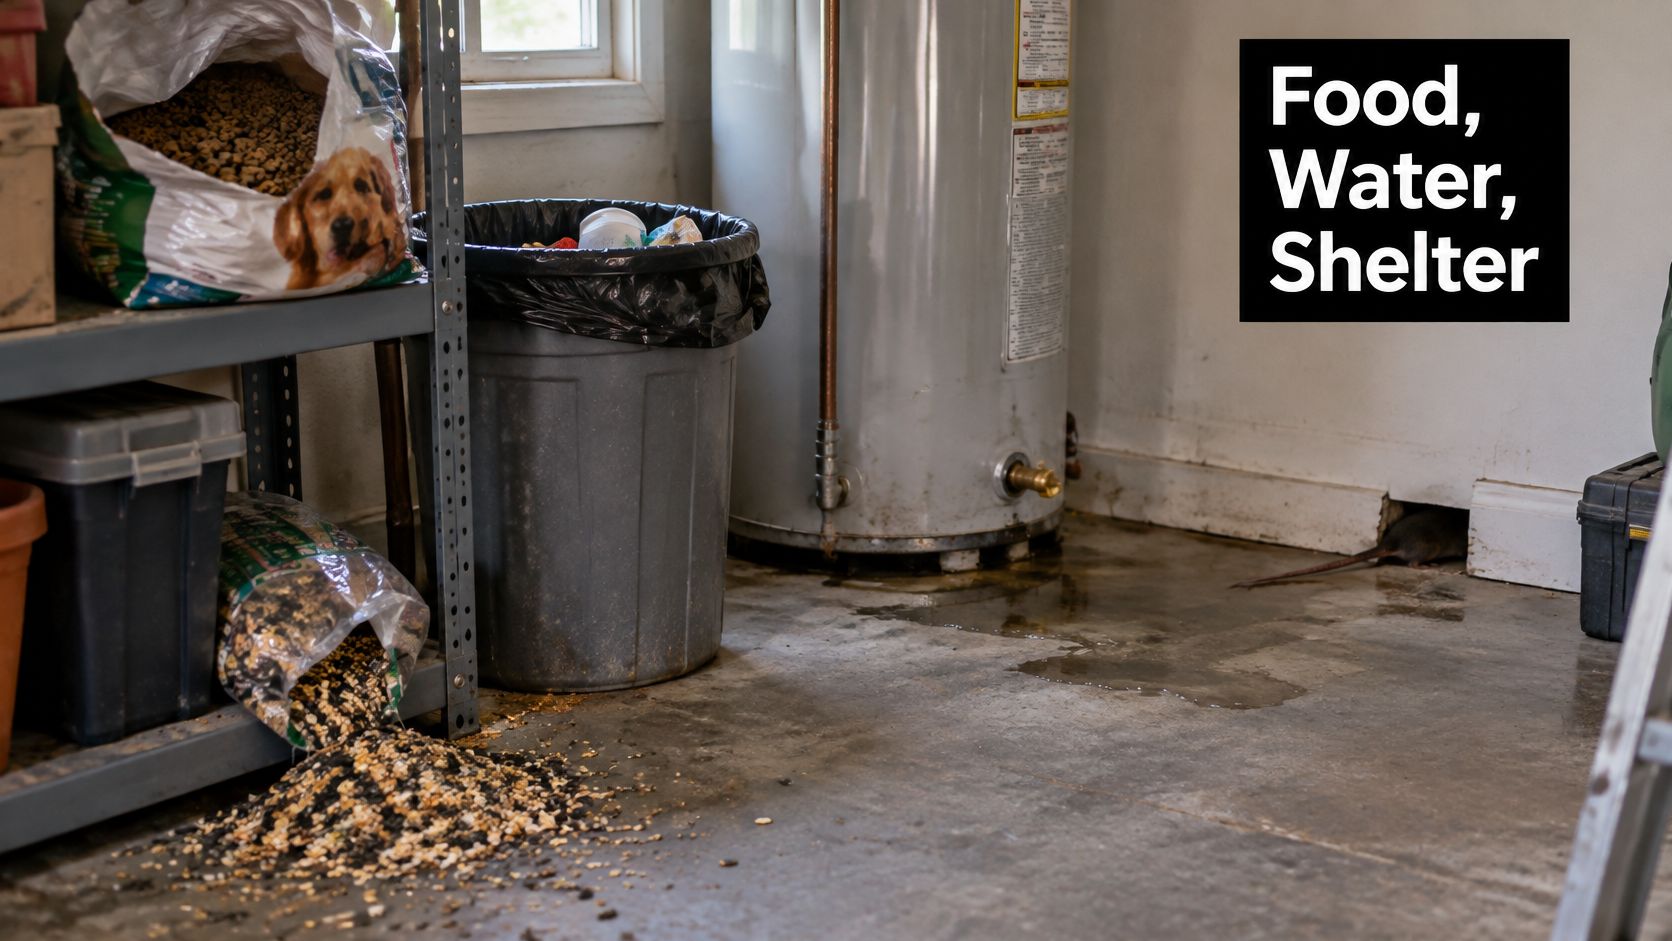
Food is the vacancy with the strongest pull, and it's rarely the obvious one. A sealed bag of dog food in a plastic bin with a lid that doesn't latch, a scoop of birdseed on a shelf, a case of fruit sitting on the floor waiting to go inside, a bin of recycling with a syrup bottle still in it. Rats have a strong sense of smell and follow food scent trails back to the same shelf repeatedly.
Water is easier to overlook because it doesn't look like a source. A slow drip under the utility sink, condensation puddling beneath a chest freezer or dehumidifier, a pet bowl filled and left overnight, a sprinkler head that wets the same corner of the slab. A rat can get most of its water from food, which is why a garage with no obvious leak still qualifies.
Shelter is the vacancy you created. Cardboard boxes stacked against a wall, a bag of old clothing, stacked lumber, firewood leaned against the exterior, holiday decor that hasn't moved in three years. All of it offers dark, undisturbed space, and cardboard does double duty as nesting material.
A one-hour garage audit
Walk the room with a notepad and be literal about it. Write down every item that could feed a rodent, every damp patch you can find, and every pile that hasn't been moved this year. Then rank the list by how easy each item is to remove tonight. The bag of birdseed goes first. The stacked boxes can wait for the weekend.
Where this becomes an entry-point problem rather than a housekeeping problem is the connections. Gaps linking the garage to crawl spaces or wall cavities let rats move between zones without ever crossing a lit floor, and that's how a garage infestation becomes a whole-house one.
Where Rats Get In and How to Seal Them
Here's the number that reframes the whole job: a rat can enter through an opening roughly the diameter of a dime, and the Centers for Disease Control and Prevention notes that EPA facility guidance recommends reducing door-bottom gaps to less than 1/4 inch (CDC seal-up guidance). A gap you'd call cosmetic is a doorway.
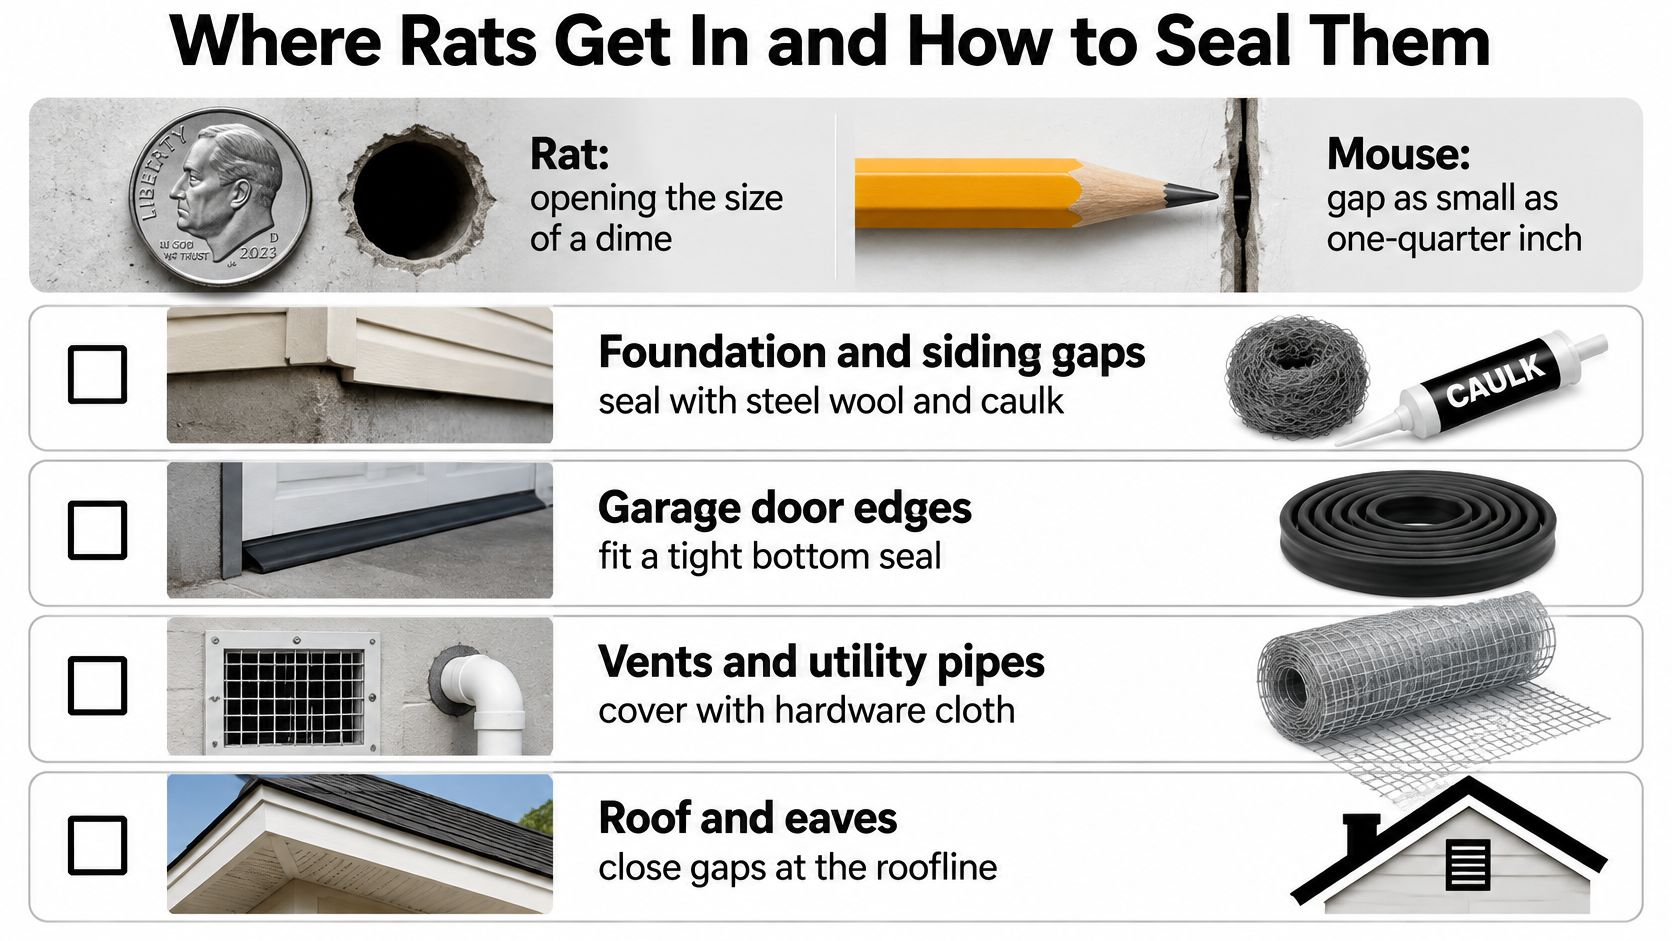
Inspect in daylight, and walk the outside perimeter first. Start at the garage door and work clockwise: the bottom threshold and both side edges, then the wall penetrations where electrical conduit and plumbing enter, then roof and soffit vents, damaged window and vent screens, and the gaps around HVAC line sets where they pass through the wall. Then repeat the same route inside, at the garage line, looking for daylight, rub marks, gnawing, and disturbed insulation.
Why expanding foam alone fails
Spray foam fills a void, but it doesn't survive a rat's incisors. Exclusion needs a pest-resistant surface that stays bonded to the structure, which is why the durable repair is usually a layer of hardware cloth, metal sheeting, cement, or copper or steel mesh pushed into the gap and secured with caulk before the cosmetic seal goes on. Foam over the top is fine. Foam alone, within a rat's reach, is a chew toy.
Construction choices matter at the same level. Florida homeowners who want a barrier rodents and termites can't chew through sometimes look at termite-proof steel framing in Florida instead of wood framing in vulnerable spots, which removes the material pests prefer rather than patching it afterward. For repairs at the gap scale, our guide to rodent exclusion materials covers which products hold up and which fail within a season.
| Entry Point | Known Gap Benchmark | Gnaw-Resistant Repair |
|---|---|---|
| Garage door bottom and edges | Reduce the gap to less than 1/4 inch | Properly fitted metal weatherstripping or a door sweep |
| Electrical conduit and plumbing penetrations | Rats can use an opening about the diameter of a dime | Copper or steel mesh secured with caulk, then cement or metal sheeting |
| Roof and soffit vents | An opening the width of a dime is enough | Galvanized hardware cloth |
| Gaps around HVAC lines | The same dime-width test applies | Metal sheeting or cement |
| Damaged window and vent screens | Mice can pass a 1/4 inch opening | Replacement hardware cloth, not screen alone |
One warning belongs beside every sealing job. Closing a gap while a rat is still inside can trap it in a wall or ceiling cavity, and a dead rodent behind drywall is a far worse problem than a live one you can see. Trap and remove first, confirm the activity has stopped, then seal, then inspect the same points again two weeks later.
Health and Vehicle Risks You Should Not Ignore
A garage that looks like a storage locker can hide a problem already reaching the kitchen and the car in bay two. That's the part often underestimated: the stakes aren't clutter damage, they're exposure and infrastructure.
The EPA states that Norway rats, roof rats, and house mice can damage property, crops, and food supplies each year in the United States, and that they can spread disease (EPA on rats and mice). Human exposure happens three ways: through bites, through eating food or drinking water contaminated by rodent waste, and by breathing dust contaminated with droppings and other waste. Ticks, mites, and fleas that ride on rodents can transmit infections indirectly, which is why a garage used by pets deserves the same attention as a kitchen.
What the damage actually looks like
Rats gnaw constantly to keep their incisors worn down, and in a garage the targets are wiring insulation, packaging, insulation batts, and the soft materials stored on low shelves. Engine compartments are a natural extension of that, because a warm hood over a concrete floor is shelter. Treat the car as part of the rodent habitat, not as a separate room.
Pets and children sit in the same exposure zone. Droppings and contaminated surfaces are a direct risk where a dog noses through a corner or a child reaches behind a shelving unit to fetch a ball. The risk grows the longer the evidence sits there, because activity tends to increase before it decreases.
Anything chewed near a battery or a wiring loom is worth a same-week inspection of the vehicle, even if you never see the animal.
One more structural point, from the regulatory side. The EPA requires consumer rodenticide products to use bait stations that protect children and pets, and loose consumer bait is no longer permitted. That rule exists because of exactly the scenario a garage creates: poison set where a pet or a toddler can reach it, or carried by a dying rat into a wall cavity where it can't be retrieved.
Safe Cleanup and Trap Steps to Follow
Cleanup is where garage rat work goes wrong, not because people are careless, but because the risk is invisible. Municipal guidance is blunt on two points: traps and baits must be kept away from children and pets, and they belong where rodent activity is evident, not scattered around the room (Hamilton Township rat control guide). If you're unsure whether the pellets are rat or mouse, how rat droppings differ from mouse droppings covers size, shape, and placement.
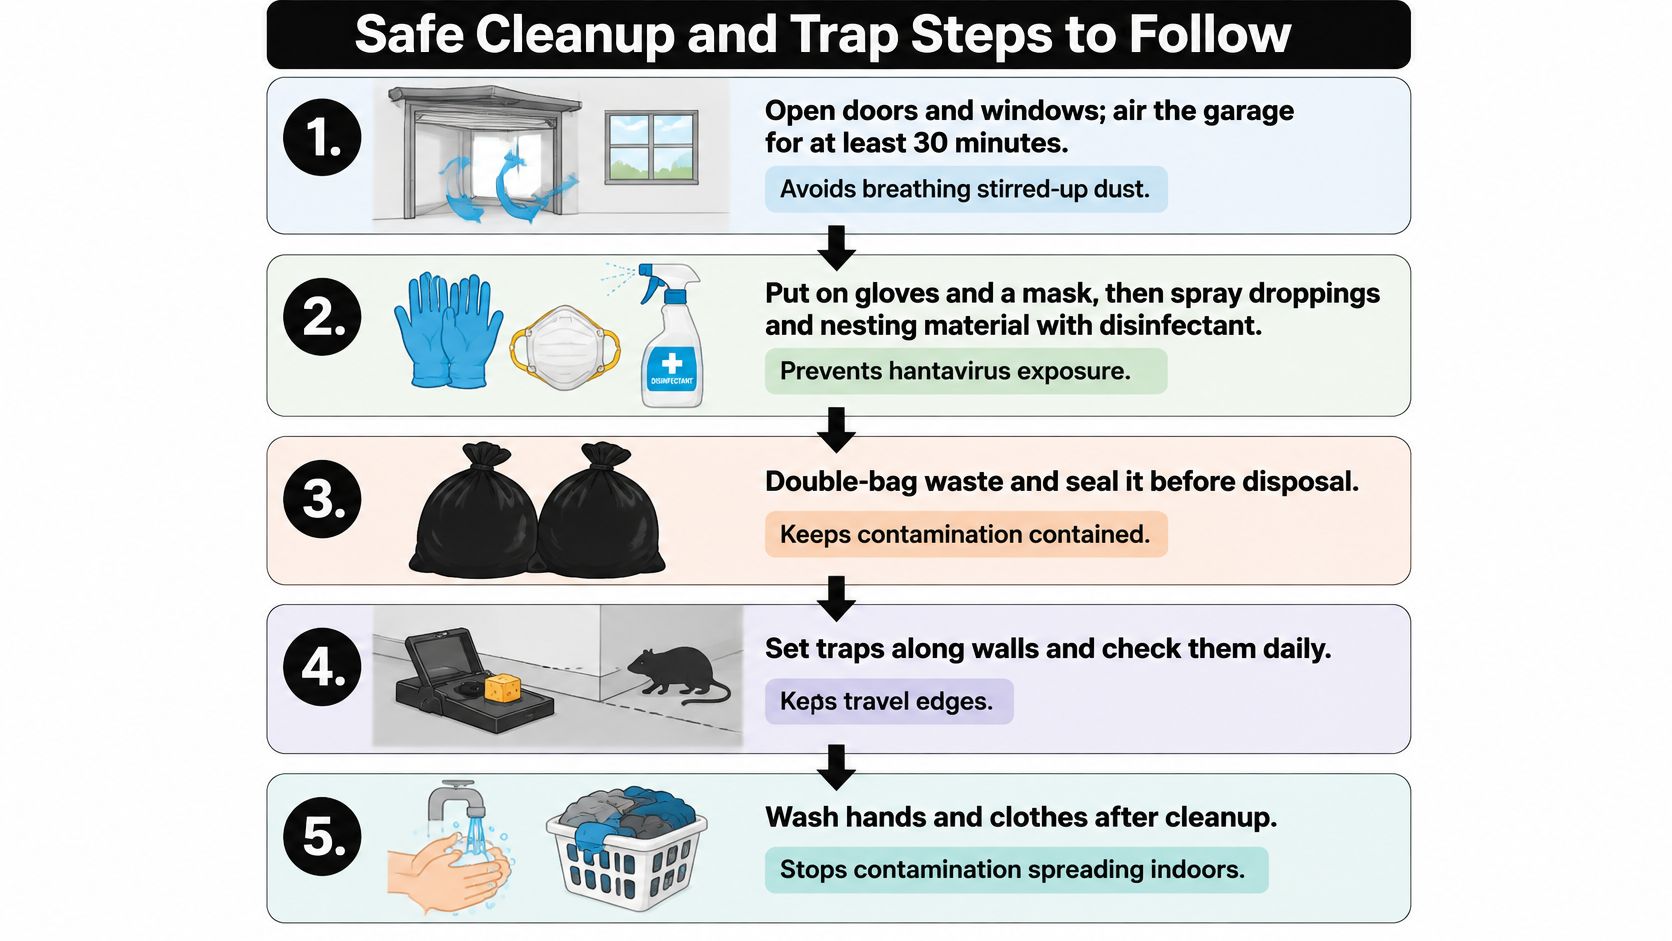
- Air the space before you enter it. Open the garage door and any windows and let the room breathe for at least 30 minutes before you start cleaning. Enclosed spaces with rodent contamination hold dust that carries the waste particles you're trying to avoid.
- Cover up, then soak. Put on gloves and a mask, then spray droppings and nesting material with a household disinfectant or a bleach solution and let it sit for a few minutes. This is the step that stops contaminated dust from going airborne.
- Never sweep or vacuum dry droppings. A broom and a shop vacuum both launch contaminated dust into the air you're standing in. Wipe the soaked material up with paper towels instead.
- Double-bag everything and seal it. Nesting material, chewed packaging, and used towels go into a bag, then a second bag, sealed before it leaves the garage and goes into an outdoor bin.
- Remove the three attractions. Clear the food, fix or dry the damp spot, and break down the clutter piles. This is the step that decides whether the work holds or repeats.
- Place traps against walls, out of reach. Rats travel edges, so traps go along the wall line where you found droppings, inside tamper-resistant stations if pets or children use the garage.
- Check and record daily. Note date, location, and what you caught. The pattern tells you whether you're winning or whether a route is still open.
Avoid placing loose poison or improvised bait. Beyond the pet and child risk, a poisoned rodent often dies inside a wall, a ceiling, or a vehicle where it can't be retrieved, and the smell that follows is its own remediation job.
Protect the car in the same pass
Pop the hood in daylight after the garage has aired. Look along the wiring harness and the top of the engine block for shredded insulation, droppings, or a nest tucked against the firewall. If you find nesting, remove it with gloves, then have the wiring checked before you drive, since chewed insulation is a problem you can't assess by eye from across the room. Take pet food, birdseed, and grocery bags out of the garage the same day you clean.
New droppings a week after cleaning mean entry points are still open. That's the signal to move from cleanup to exclusion.
Decide When to Call a Licensed Pro
DIY handles a small, visible problem with clear entry points. It stops working when rats are nesting inside walls or ceilings, when activity continues after sealing and cleaning, or when the entry points sit behind structure you can't reach. The cost of guessing is real: a February 2024 ConsumerAffairs survey found that 30% of Americans who had fought pests in their homes during the previous year spent between $1,001 and $5,000 (Our Weekly report on the ConsumerAffairs survey). That range is a reason not to repeat failed DIY rounds, not a quote for garage rats.
| Situation | DIY Reasonable? | Call a Licensed Pro? |
|---|---|---|
| Few droppings, no nesting, clear entry points | Yes, clean and seal | Not needed |
| Gnawing or nesting in walls, ceiling or insulation | No | Yes |
| Activity continues after sealing and cleaning | No | Yes |
| Entry points behind inaccessible structure | No | Yes |
| Rats near vehicle wiring or engine compartments | Inspect only | Yes |
What a professional inspection covers
A real inspection identifies the rodent species, maps nesting areas, and finds every likely entry point rather than the two obvious ones. Removal of rodents currently inside comes next, then cleanup of droppings and contaminated material, with insulation remediation where it's soaked through, then sealing of gaps, vents, rooflines, and utility penetrations so the same routes can't reopen. That first inspection is the cheapest part of the job and the one that prevents a second round.
Our rodent control services page explains how that sequence runs, and Pestless's Rodent Control service follows the same order: an inspection that identifies the species, nesting areas, and likely entry points, strategic trapping and removal of rodents inside the structure, and sealing of gaps, vents, rooflines, and utility penetrations so they can't return.
Sealing is also carpentry. A rotted door jamb, a misaligned garage door, or a hole behind siding needs a proper repair before weatherstripping or mesh will stay put, which is why some homeowners book a fully insured handyman for the structural fix and leave the exclusion work to pest control.
Before you call anyone, photograph the signs, list the entry points you found, and note the date of each sighting. That record shortens the inspection and gives whoever you hire a head start.
If you'd rather hand this off than spend another weekend with a flashlight, Pestless Inc. connects Miami and Miami-Dade homeowners with licensed, insured pest control professionals who handle rodents from inspection through sealing, including an inspection that identifies the species, nesting areas, and likely entry points. Describe what you've seen in the garage, from droppings along the wall to a chewed wire near the engine, and compare zero-cost, no-obligation quotes from vetted local providers. Visit Pestless Inc. to start a request, with typical responses within one business hour Monday through Saturday, 7am to 9pm ET.
Dealing with this pest right now?
Pestless connects you with a licensed, insured Miami pest control provider for a free, no-obligation quote.